Checkbook
This chapter will give you all the specific information you need to manage your checkbook with GnuCash. Managing your checkbook register is the first step of tracking your finances, and GnuCash makes it much easier to manage than the traditional paper register does.
For one thing, as discussed in Transactions, data entry of common transactions is practically done for you in GnuCash, because of its auto-completion feature. GnuCash keeps a running balance of each account, and it makes reconciling these accounts easy. And the double-entry method helps you account for your spending by requiring a transfer account for withdrawals, so you can easily find out how much money you spend in different areas.
Once you are comfortable with using GnuCash for your checking and other bank accounts, you may wish to continue on with tracking other financial accounts. Chapters 6 through 9 examine methods to manage your other accounts.
Setting up Accounts
The first step in managing your checkbook is to set up the necessary accounts. You can either use the default GnuCash accounts or set up your own. For more detail on how to set up a new account, refer to The Basic Top Level Accounts. For instructions on importing your accounts from another program, refer to the GnuCash manual.
Let’s start with the bank accounts you’ll need. You need one GnuCash bank type account for each physical bank account you wish to track. If you are setting up your own accounts or using the default GnuCash accounts, make sure that you have an opening balance transaction for each bank account you own. The easiest way to get this number is to use the balance from your last bank statement as your opening balance. You can enter this in the account information window automatically as part of the New Account Hierarchy Setup assistant, or you can enter a manual transaction directly in the account. To enter the transaction manually, enter a transfer from an Opening Balances account (type equity) to the bank account.
The typical bank accounts you might track include:
Checking - any institutional account that provides check-writing privileges.
Savings - an interest-bearing institutional account usually used to hold money for a longer term than checking accounts.
Common transactions that affect these bank accounts are payments and deposits. Payments are transfers of money out of the bank account, usually to an expense account. Deposits are transfers of money into the bank account, usually from an income account. You will need to set up income and expense accounts to track where that money comes from and where it goes. Remember that a balanced transaction requires a transfer of an equal sum of money from at least one account to at least one other account. So if you deposit money in your checking account, you must also enter the account that money comes from. If you pay a bill from your checking account, you must also enter the account where that money goes.
Entering Deposits
Most deposit transactions are entered as a transfer from an income account to a bank account. Income may come from many sources, and it’s a good idea to set up a separate income type account for each different source. For example, your income may come mainly from your paychecks, but you may also receive interest on your savings. In this case, you should have one income account for salary and another income account for interest income.
Tip
Be sure to check the Tax-Related box and assign an appropriate tax category in the Income Tax Information Dialog (Edit > Tax Report Options) when you set up taxable income accounts. Some types of income, such as gift income, may not be considered taxable, so check the appropriate tax rules to determine what is taxable. For ways to track capital gains income, refer to Capital Gains.
Before you start entering paycheck deposits, decide how much detail you want to track. The basic level of detail is to enter your net pay, just like you would in your paper register. This is easiest, but you can get even more information out of GnuCash if you enter your gross pay with deductions. It takes a bit more effort to enter the deductions, but entering your tax withholding information throughout the year allows you to run useful tax status reports in GnuCash at any time. These reports can help you determine whether you are withholding enough tax, and they can help you estimate your tax bill ahead of time. If you are unsure about the level of detail, start by entering net pay. You can always go back and edit your transactions later if you decide you want more detail.
Entering Withdrawals
When you withdraw money from your bank account, for whatever reason, you are transferring money from your bank account to some other location. In GnuCash, this other location is tracked as an account. The more detailed accounts you create and use for your spending, the more information you will get about where your money goes.
Withdrawals take many forms. ATM withdrawals are one of the most common transactions. Writing checks is one way to withdraw money to pay bills, to buy purchases, or to give to charity. Depending on your bank, you might also have service charges, where the bank withdraws the money from your account. Transfers of money out to another account are also withdrawals. We will take a look at each of these types of withdrawals and how to record them in GnuCash.
ATM/Cash Withdrawals
Cash withdrawals are handled as a transfer from a bank account to a cash account. GnuCash provides special Cash type accounts for tracking your cash purchases, so you should set up a cash account to record your ATM and other cash withdrawals.
Cash accounts can be used for different levels of detail. On a basic level of detail, you simply transfer money to it from your checking account. That tells you how much money you took out of checking on a given day, but it doesn’t tell you where that cash was spent. With a little more effort, you can use the cash account to record your cash purchases as well, so that you can see where that cash went. You record these purchases as a transfer from the cash account to expense accounts.
Some people record every cash purchase, but this takes a lot of work. An easier way is to record the purchases for which you have receipts, but then adjust the balance of the account to match what is in your wallet.
It’s a good idea to at least set up a cash account for your withdrawals. Then if you decide to track where your cash goes, you can enter transactions for the money you spend. You determine what level of detail you want to use.
Reconciling Your Accounts
GnuCash makes reconciliation of your bank account with your monthly bank statement much easier. Reconciliation gives instructions on how to reconcile your transactions with the monthly bank statement. This is the main reconciliation task that should be done every month.
But what about all those other accounts you created? Should those be reconciled too? If you receive a statement for the account, then you should consider reconciling that account. Examples include the checking account statement, the savings account statement, and the credit card statement. Credit card statements and credit card transactions are covered in the Credit Cards, so if you are interested in tracking your credit cards in GnuCash, take a look at the instructions provided there.
Income and expense accounts are usually not reconciled, because there is no statement to check them against. You also don’t need to reconcile cash accounts, for the same reason. With a cash account, though, you might want to adjust the balance every once in a while, so that your actual cash on hand matches the balance in your cash account. Adjusting balances is covered in the next section.
Putting It All Together
In Transactions, you entered some transactions in your checking account. In this chapter, we will add more transactions and then reconcile them.
Opening Balances
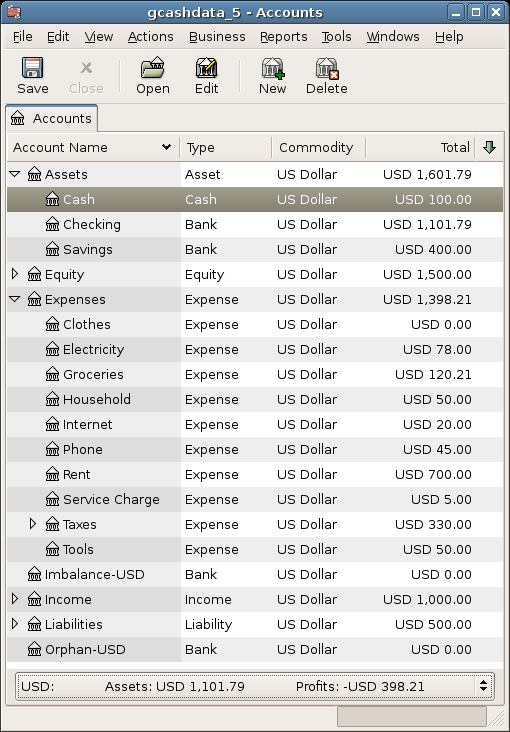
So, let’s get started by opening the gcashdata file you saved in the
last chapter (gcashdata_4). Your chart of accounts should look like
this:
Add some transactions
Now open the Checking account from the main window. In the last chapter, you entered some paycheck transactions as deposits into Checking. Now we will enter another kind of deposit - a transfer of money from Savings into Checking. On a blank line, enter a transaction to transfer $500 from Savings to Checking (In this case, the last transaction date was March 28, but this transfer transaction took place on the March 24). Your Transfer account will be Savings, since you are in the Checking account. Your Checking account should now look like this:
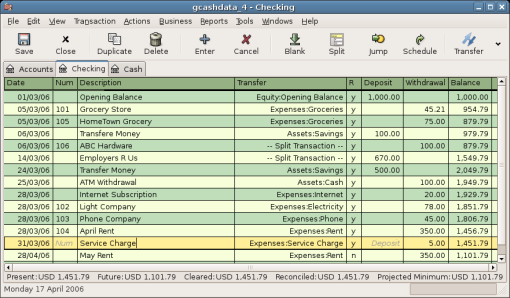
Now let’s write some checks on this account. First, write a check to HomeTown Grocery for $75 (5th of March). Your transfer account is Groceries, since all of this money is going to buy groceries. Next, write a check to ABC Hardware for $100 (6 of March), and split this amount between two expenses: Household $50 and Tools $50. You will need to create an Expense type account for each of these, then enter splits for them. Your checking account should now look like this;

Suppose you now need to withdraw some money. You don’t have a cash account set up in your chart of accounts, so you will need to create one. Create the account as Cash as a top-level account of type Asset. From your Checking account register, enter an ATM type withdrawal to transfer $100 from Checking to Cash on the 25 of March.

Opening Balances
Now we are ready to reconcile this Checking account, using this sample bank statement:
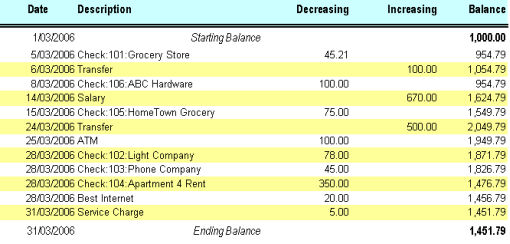
Select Actions > Reconcile from the menu, and fill in the Closing balance as $1451.79. Click OK to begin reconciling the account. Check off the entries as they appear on the sample statement. When you have checked off all your entries, the reconcile window should look like this:
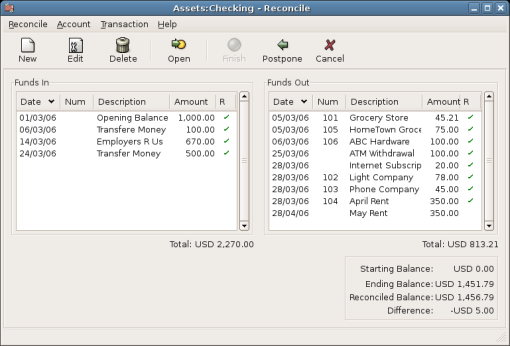
Notice that your reconciled balance differs from your ending balance by $5.00. If you look at the sample bank statement, you will see there is a $5.00 service charge that has not been added to your Checking account.
So click on the Checking register and add the $5.00 service charge to your Checking account. On a blank line of the Checking register, enter a transaction to transfer $5.00 from Checking to a Service Charges account. (You will need to create the Service Charges account as type Expense.) Use the transaction date printed on the sample statement as the date you enter for this transaction. Your Checking account should now look like this:

Click back on the Reconcile window, and you should see the service charge now under Funds Out. Click on it to mark it as reconciled, and note that the difference amount below now becomes 0.00. Click the Finish button on the Toolbar to complete the reconciliation. The Reconcile R column in your Checking register should now show y for each transaction you just reconciled. Also observe the bottom status row that now indicates Reconciled: USD 1451.79

Save file
Go back to the main window and save your file with the new
gcashdata_5 name. Your chart of accounts is steadily growing, and it
should now look like this:

Reports
As we did in the previous chapter, let’s have a look at a Cash Flow, and a Transaction Report.
First let’s have a look at the Cash Flow report for the month of March.
Select the cash flow report from Reports > Income & Expense > Cash Flow.
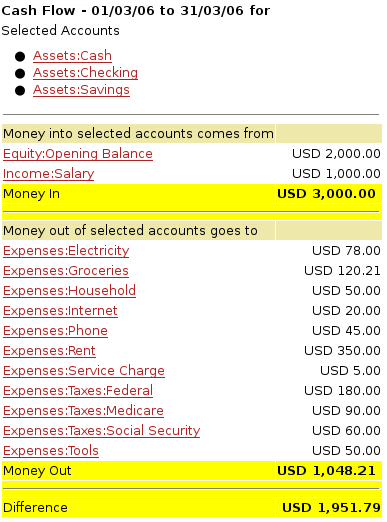
Now let’s have a look at corresponding transaction report for the various Asset accounts.
Select the transaction report from Reports > Transaction Report.
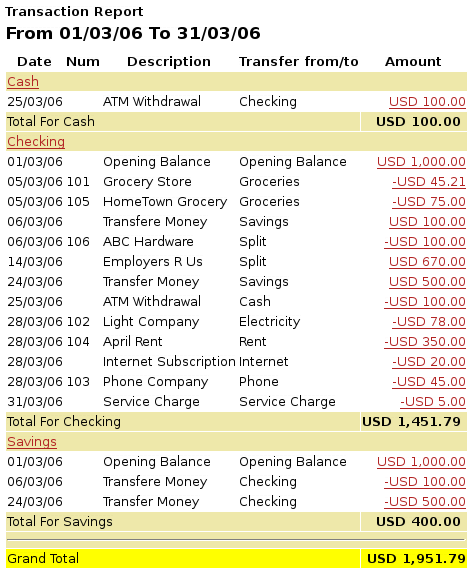
Now let’s change the transaction report to only show the various Expenses account.
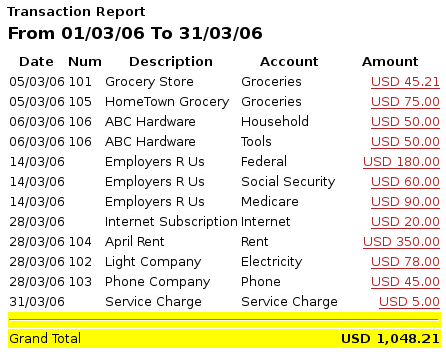
Notice that you have not yet used one of the accounts listed in your chart, the Credit Card account. Now that you know how to keep track of your bank and cash accounts in GnuCash, you may want to start tracking your credit cards as well. GnuCash provides a special type of account for credit cards, and this is discussed in the next chapter.