Business Features
Introduction to Business Features
The accounting needs of a business are quite different from that of a person. Businesses have customers that owe money, vendors which are owed money, employee payroll, more complex tax laws, etc. GnuCash offers business oriented features to facilitate these needs.
Accounts Receivable (A/R) are used by businesses to record sales for which they are not immediately paid. This is represented on the balance sheet as an asset, because the expectation is that you will receive payment soon.
Accounts Payable (A/P) record bills that businesses have received, but may not pay until later. This is represented on the balance sheet as a liability because you will have to pay for them.
A/R and A/P accounts are used primarily when you have a lot of bills and receipts flowing in and out, and do not want to lose track of them just because you do not pay or get paid right away. For most home users, A/R and A/P are too complicated to be worthwhile.
Business Setup
To set up GnuCash to handle accounts receivable or accounts payable for a company, these preliminary steps must be done.
Build an appropriate Account Hierarchy.
Set up Sales Tax Tables.
Enter the company information in GnuCash.
Set Business Preferences.
Set up Billing Terms.
Account Setup
There are many different ways to set up a business account hierarchy. You can start with the Business Accounts setup which is available from the New Account Hierarchy assistant, or you could build one manually. To access the prebuilt Business Accounts, start GnuCash and click on File > New File and proceed until you see the list of available accounts, select Business Accounts.
The prebuilt Business Account hierarchy will not meet your needs exactly. You will need make adjustments to the hierarchy so that it will meet your particular needs. It should be close enough, however, that it is recommended you begin with it.
To use GnuCash’s integrated accounts receivable system, you must first set up a special account (usually a sub-account under Assets) to hold transactions for receivables. This account must be defined with account type A/Receivable. GnuCash will use this account to place transactions related to the integrated accounts receivable system.
To use GnuCash’s integrated accounts payable system, you must first set up an account (usually a sub-account under Liabilities) to hold transactions for payables. This account must be defined with account type A/Payable. GnuCash will use this account to place transactions related to the integrated accounts payable system.
Basic A/R and A/P Account Hierarchy:

-Assets
   -Accounts Receivable
   -Checking
-Expenses
  ...(as required)
-Income
   -Sales
-Liabilities
  -Accounts Payable
  -Tax
      -Tax on Purchases
      -Tax on Sales
You need to add additional accounts to this hierarchy for it to be useful.
Note
You do not need to create an individual A/R account for each customer. GnuCash keeps track of customers internally and provides per-customer reports based on the internal tracking. The same applies to A/P and vendors.
Note
If you deal with customers in more than one currency you will need a separate Accounts Receivable account for each currency.
If you deal with vendors in more than one currency you will need a separate Accounts Payable account for each currency.
Note
Transactions involving an Accounts Receivable or Accounts Payable account should not be added, changed or deleted in any way other than by using Post/Unpost Bill/Invoice/Voucher or Process Payment!
Setting up Sales Tax Tables
Sales Tax Tables can used to determine the tax for customer invoices (or vendor bills).
A tax table entry can be assigned to an invoice line or bill line.
Set up distinct tax tables for customers and vendors.
The default invoice tax table entry can be assigned to each customer and the default bill tax table entry can be assigned to each vendor.
The default tax table entry for new customers or new vendors can be specified in the Book Options window which can be accessed by File > Properties > Business tab.
Sales Tax Tables are maintained using the Sales Tax Table editor which is accessed via menu Business > Sales Tax Table.
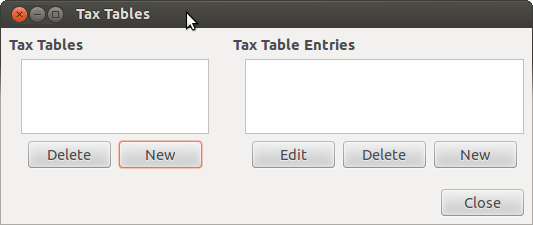
Sales Tax Tables Editor
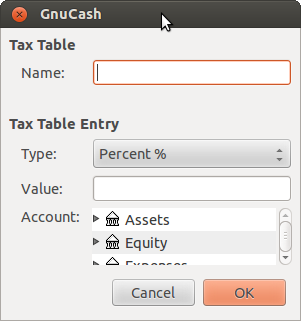
New Sales Tax Table Entry
Name This is the tax table name.
Type Either Percent % or Value $.
Value This is the percentage or value depending on Type.
Account This is the account to which tax will be posted. For tax collected from customers, this should probably be a Liability account as it must be payed to the government. For tax paid to vendors, if tax laws allow tax paid to vendors to offset tax collected from customers, this should probably also be a Liability account (even though it will usually have a debit balance) so that the net tax owed to the government can be easily observed.
If you set up Tax on Purchases and Tax on Sales as subaccounts of Liabilities:Tax then the net tax will be rolled up and can be seen in the GnuCash Accounts tab.
If unsure about tax law requirements, get professional advice.
The following charts illustrate sample tax tables and may be used as starting points to determine the setup appropriate for a particular jurisdiction.
Belgium, 20% / 5% / 0% UK etc.) (2017)
Tax Table
Tax Table Entries [Asset/Liability]
Percentage or Amount
Standard VAT Sales
VAT:Sales:Standard [L]
21%
Reduced VAT Sales
VAT:Sales:Reduced [L]
6%
Zero-Rated VAT Sales
VAT:Sales:Zero [L]
0%
EC Sales
VAT:Sales:EC [L]
21%
VAT:Sales:Reverse EC [L]
-21%
Standard VAT Purchases
VA T:Purchases:Standard [A]
21%
Reduced VAT Purchases
V AT:Purchases:Reduced [A]
6%
Zero-Rated VAT Purchases
VAT:Purchases:Zero [A]
0%
Tax Table |
Tax Table Entries [Asset/Liability] |
Percentage or Amount |
|---|---|---|
Standard GST Sales |
GST:Sales:Standard [L] |
10% |
GST-free Sales |
GST:Sales:Zero [L] |
0% |
Standard GST Purchases |
GS T:Purchases:Standard [A] |
10% |
GST-free Purchases |
GST:Purchases:Zero [A] |
0% |
Tax Table |
Tax Table Entries [Asset/Liability] |
Percentage or Amount |
|---|---|---|
Chicago Sales Taxes |
Taxes:Sales:State [L] |
6.25% |
Taxes:Sales:City [L] |
1.25% |
|
Taxes:Sales:County [L] |
1.75% |
|
Taxes:Sales:Region [L] |
1% |
Enter Company Information
After you have built the account structure and defined your tax tables, designate your company in the GnuCash file. To do this, select the Business tab in the Book Options window, which can be accessed from File > Properties.
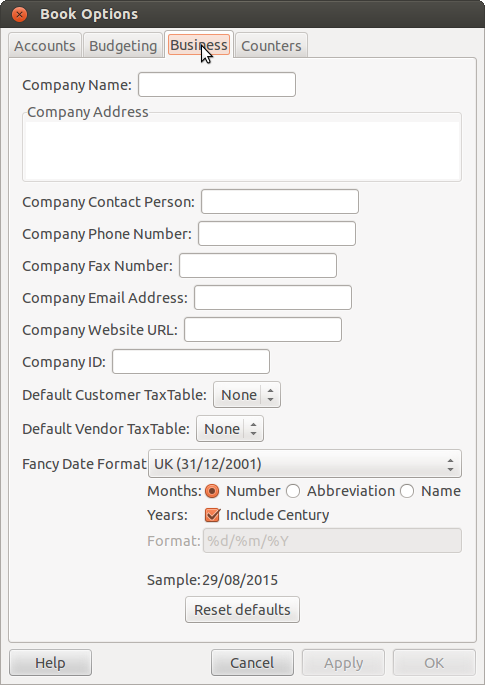
Entering Company Information
Here you can:
Enter the name of your company along with contact information such as your phone number, fax number, e-mail address and website URL.
Enter your company’s tax payer id number in the Company ID field.
Select default tax tables applicable to your most common customers and vendors.
Setting Business Preferences
Set options on the Business tab of the GnuCash preferences, which is accessed via Edit > Preferences (GnuCash > Preferences on MacOS). See Help manual chapter 10.3.3 Business Book Options Tab.
Setting Billing Terms
Billing Terms can be used to determine the payment due date and be a guide for determining discount for early payment of invoices (or vendor bills).
Note
As of GnuCash 2.6.7, Billing Terms are only partially supported. Date due is calculated using the Billing Terms but discount amount is not.
Discount for early invoice payment is not implemented. There are 2 ways this may be done, although neither is recommended, and professional advice should be used to confirm that regulations are being complied with:
After creating and posting a payment which pays the invoice in full, manually edit the payment transaction (usually strongly discouraged) and split the payment to reduce it by the amount of the discount and create a compensating split in an income (discount) account.
Alternatively, after creating and posting a payment for the discounted amount, create a credit note for the discount using a specific negative sales income (discount) account for the transfer account.
You can specify the billing terms on each invoice/bill. Invoice billing terms will default from the customer billing terms. Bill billing terms will default from the vendor billing terms.
Billing Terms are maintained using the Billing Terms Editor which is accessed via menu Business > Billing Terms Editor.

Billing Terms Editor
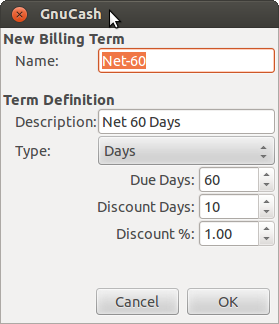
New Billing Term
Name The internal name of the billing term. For some examples of billing term names and descriptions see ` <https://wiki.gnucash.org/wiki/Payment_Terms>`__.
Description The description of the billing term, printed on invoices
There are 2 types of billing terms, with different information to be entered
Type Days
Due Days The invoice or bill is due to be paid within this number of days after the post date
Discount Days The number of days after the post date during which a discount will be applied for early payment
Discount % The percentage discount applied for early payment
Type Proximo
Due Day The day of the month bills are due
Discount Day The last day of the month for the early payment discount
Discount % The discount percentage applied if paid early
Cutoff Day The cutoff day for applying bills to the next month. After the cutoff, bills are applied to the following month. Negative values count backwards from the end of the month.
Accounts Receivable
Accounts Receivable (or A/R) refers to products or services provided by your company for which payment has not yet been received.
System Components
Transactions generated by the A/R system are recorded within the Accounts Receivable account. You should not work directly with this account. Instead, you will work with the four integrated GnuCash A/R application components available through the Business > Customer sub-menu. These four components are:
Customers are people or companies to whom you sell products or services on credit.
Invoices represent the physical invoice you send to a customer to request payment. This invoice contains an itemized list of things you sold.
In addition, GnuCash also has support for Credit Notes which represent the inverse of Invoices. A credit note is usually handed to a customer to correct items that were incorrectly invoiced or returned.
Both document types will be set up using the same menu items. Credit notes were introduced starting with GnuCash stable release 2.6.0.
Jobs (optional) is where you register Customer Jobs. Jobs are a mechanism by which you can group multiple invoices to a particular customer.
Process Payments is used to register payments you received from a customer.
Customers
Customers are people or companies to whom you sell goods or services. They must be registered within the A/R system.
New
To register a new customer, enter the menu Business > Customer > New Customer. Fill in customer information, such as Company Name, Address, Phone, Fax, etc.
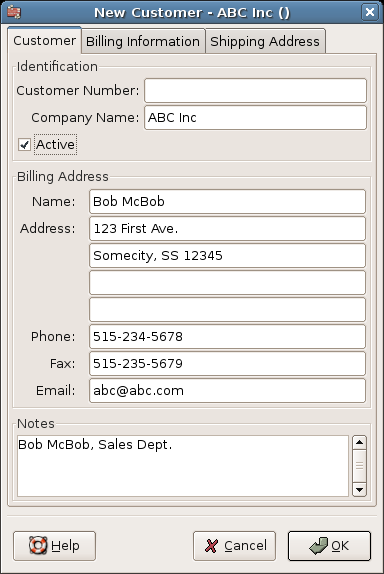
New Customer Registration Window
Find and Edit
To search for an existing customer, use the Business > Customer > Find Customer window. You select a customer to View/Edit from the results of the search. This window is also used to look up customers when creating invoices and processing payments.
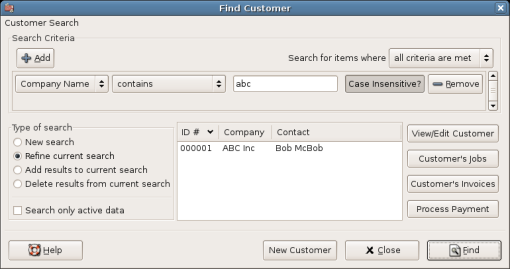
Find Customer Window
If many customers match the search criteria you provide, the search can be refined by running an additional search within the current results. The current result set is searched when the Refine Current Search radio button is selected. In fact, GnuCash selects this option for you after you run the initial search.
If the customer you are searching for does not match the supplied search criteria, change the search criteria, click the New Search radio button and then the Find button. The relevant step is the New Search selection. If the customer is not in the result of the original search, and you only search within this set, the customer cannot be found, regardless of new search criteria.
Note
To return a list of all registered active customers, set the search criterion to matches regex, and place a single dot “.” in the text field area. Make sure Search only active data is checked, then click Find. The regular expression “.” means to match anything.
Invoices
An invoice is the paperwork you send to a customer to request payment for products or services rendered. GnuCash can generate and track invoices.
A credit note is the paperwork you send to a customer to correct products or services rendered that were incorrectly invoiced. GnuCash can generate and track credit notes via the same menu entries as invoices.
Note
This section applies to both invoices and credit notes. In order to avoid repeating everything twice and to keep the text easier to read it will refer only to invoices. You can apply it equally to credit notes. Only where the behavior of credit notes differs from invoices this will be explicitly mentioned.
New
To send an invoice to a customer you must first create the new document. To create an invoice use Business > Customer > New Invoice. The New Invoice window must be filled in appropriately.
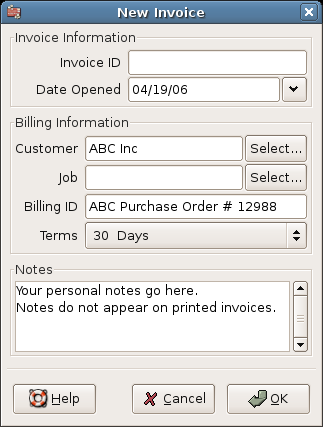
Creating a New Invoice
When you click the OK button, the Edit Invoice window opens.
Edit
From the Edit Invoice window you can enter an itemized list of goods and services you sold on this invoice in a manner similar to how the account register works. For credit notes you enter an itemized list of goods and services you refunded instead.
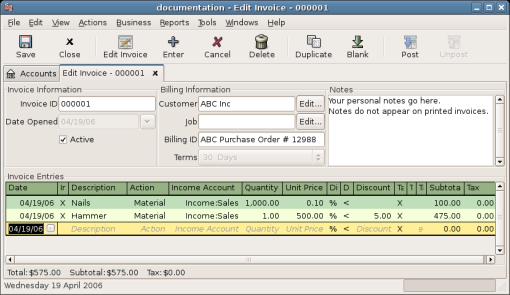
Edit Invoice Window
When you have finished entering all the items, you can Post and print the invoice.
Post
When you finish editing an invoice and are ready to print, you must Post the invoice. The invoice does not have to be posted immediately. In fact, you should only post an invoice when you are ready to print it. Posting an invoice places the transactions in an accounts receivable account.
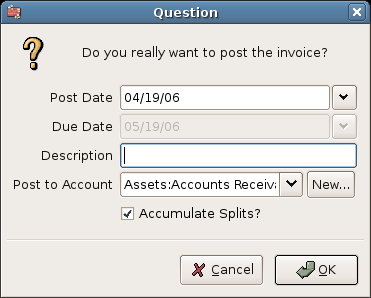
Post Invoice Window
Find
To find an existing invoice, use the Business > Customer > Find Invoice menu item. From the results of the search, you can select an invoice to edit or view.
Note
Before you can edit a posted invoice, you will need to Unpost it.
One of the design goals in GnuCash’s Account Receivable system was to allow different processes to get to the same state, so you can reach an invoice from different directions based on the way you think about the problem:
You can search for the customer first, then list their invoices.
You can search for invoices by number or by company name.
You can list invoices associated with a customer job.
Print
After you post an invoice, you should print it and send it to your customer. To print an invoice use File > Print Invoice menu item.
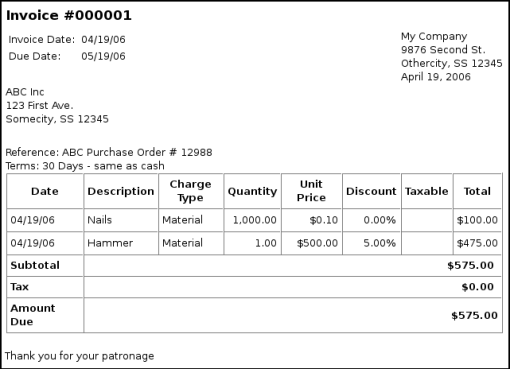
Invoice Print Output
Note
You can modify the appearance of the invoice, IE: add a company logo, etc. To do so, see the Changing the Invoice Appearance.
Invoices can also be printed from the main window by selecting Reports > Business Reports > Printable Invoice from the main menu. The resulting report window states that no valid invoice is selected. To select the invoice to print:
Use the Options Toolbar button or select Edit > Report Options from the main menu.
Select the General tab of the report options dialog.
Click the Select button next to the Invoice Number field.
Search for the invoice as usual.
You can also print invoices from within the Process Payment dialog. See the Process Payment for instructions on how to do so.
Assign Starting Invoice Number
By default, GnuCash starts with invoice number 1 and increments from there. You can manually type an invoice number into the text box each time you create an invoice, but this gets tiring and sooner or later leads to duplicate numbers.
You can change the starting invoice number if it is important you. Use File > Properties, access the Counters tab, change the Invoice number value to be one less than your desired starting invoice number and click the OK button or the Apply button.
Customer Jobs
Customer Jobs are used to group multiple invoices and credit notes to the same customer. Use of the Customer Jobs feature is optional. The feature is useful when you have multiple jobs for the same customer, and would like to view all the invoices and credit notes related to a single job.
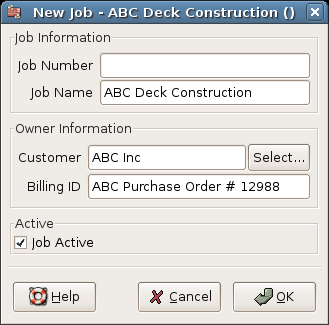
New Customer Job
To use customer jobs, you must create them using the Business > Customer > New Job menu item. You will see the New Job window.
To edit an existing customer job, use the Business > Customer > Find Job menu item. Select the desired job in the search results, and click the View/Edit Job button.
To select from the invoices and credit notes associated with a given job, use Business > Customer > Find Job menu item. Select the desired job in the search results and click the View Invoices button. A window listing invoices and credit notes associated with this job appears. Select an invoice or credit note and click the View Invoice button to open an invoice editor in the main application window.
Process Payment
Eventually, you will receive payment from your customers for outstanding invoices. To register these payments, use the Process Payment application found in Business > Customer > Process Payment.
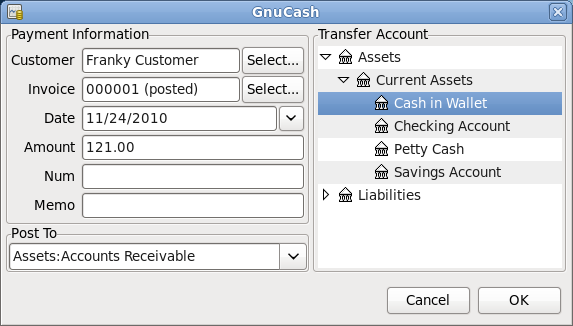
Process Customer Payment
Changing the Invoice Appearance
The default Invoice style, as shown in Print, is fairly barren. The default invoice style leaves the top part of the form blank, so you can print on company letterhead paper. There are some things you can do to change invoice appearance.
Use File > Properties to enter your Company information in the Business tab of the Book Options window. Some of the entered information is printed on the right side of invoices.
To add a customized background, heading banner or logo to invoices, modify the invoice style sheets. To do this, go to Edit > Style Sheets and select the New button in the Select HTML Style Sheet window that will appear. You will then see a window like this:
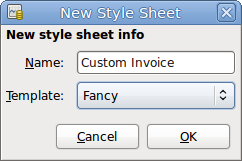
The New Style Sheet Window
Give a Name to the new style sheet (e.g. Custom Invoice) and select the Fancy Template. When you click the OK button, the HTML Style Sheet Properties window is displayed. This window presents you five sections listed in the left pane: Colors, Fonts, General, Images, and Tables. The Colors section allows you to change the colors of various items of the invoice. The Fonts section lets you set fonts type and dimensions. The General section allows you to set the Preparer and Prepared for information, and to Enable Links. The Images section allows you to import graphics into the style sheet. The Tables section allows you to adjust the spacing around the tables which make up the invoice.
To include a company logo, banner heading and background image, use your favorite graphics application such as The Gimp or OpenOffice Draw to save the images in either GIF or PNG format. Then import them into the style sheet using the Images section described above.
Below is an example that imports all three types of images.
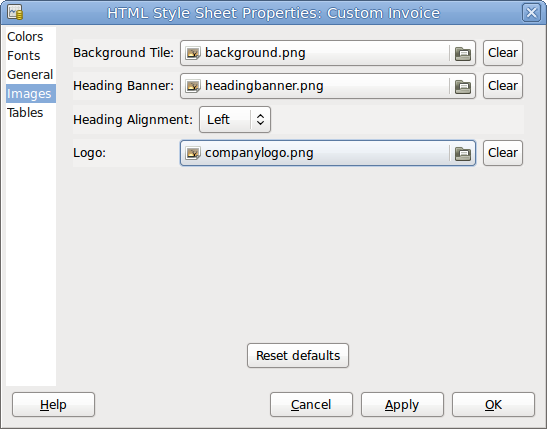
HTML Style Sheets Example Window
Note
The images are placed in the invoice as follows. The Background Tile is tiled to become the background image, the Heading Banner goes to above the invoice text, and the Logo is placed in the upper left corner of the invoice to the left of the Heading Banner. You will probably have to try a few different sized images until you get the invoices to print nicely. Some sizing suggestions are that the Logo should be 1 square cm (~0.5 inch), and the Heading Banner should be 15 cm (~6 inches) wide and 1 cm (~0.5 inch) tall.
With the style sheet configured, when you print the invoice, you select the style sheet to use from the Options menu. Below is the resultant invoice after applying the style sheet demonstrated above.
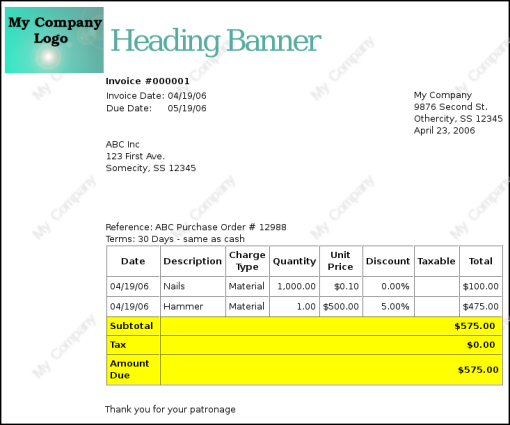
HTML Style Sheets Example Output
Accounts Payable
Accounts Payable (or A/P) refers to the accounting of products or services which a company has bought and needs to pay for.
System Components
GnuCash has an integrated accounts payable system. The transactions generated by the A/P system are placed within the Accounts Payable account, as a record of what occurs. Generally you do not directly work with this account but use the four integrated GnuCash A/P application components. The A/P components are available from the Business > Vendor sub-menu. These A/P components are:
Vendors are people or companies from which you buy products or services on credit.
Bills represent the physical bills vendors send to request payment from you. A bill contains an itemized list of things you purchased.
In addition, GnuCash also has support for Credit Notes which represent the inverse of Bills. A credit note is usually received from a vendor to correct items that were erroneously billed or returned.
Both document types will be set up using the same menu items.
Jobs (optional) is where you register Vendor Jobs. Jobs are mechanism by which you can group multiple bills from a particular vendor.
Process Payments is where you register payments to a vendor to whom you owe money.
The following sections introduce the individual Accounts Payable application components.
Vendors
A vendor is a company or person from whom you purchase goods or services. Vendors must be registered within the A/P system.
New
To register a new vendor, select the Business > Vendor > New Vendor menu item. Fill in general information about the vendor, such as Company Name, Address, Phone, Fax, etc. Below is a list of the other options:
This is what the New Vendor registration window looks like:
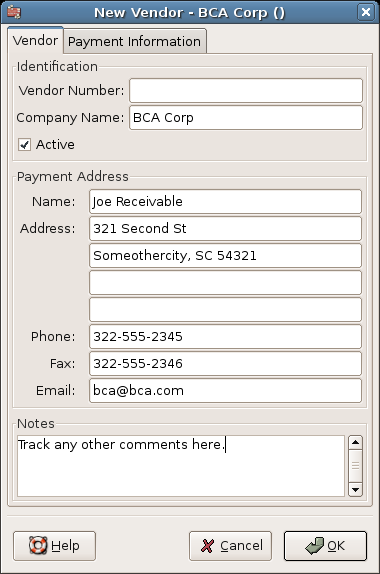
New Vendor Registration Window
Find and Edit
To search for an existing vendor, use the Business > Vendor > Find Vendor window. You select a vendor to View/Edit from the results of the search. This window is also used to look up a vendor when entering bills and processing payments.
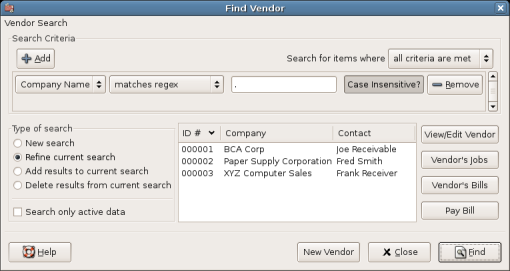
Find Vendor Window
If many vendors match the search criteria you provide, the search can be refined by running an additional search within the current results. The current result set is searched when the Refine Current Search radio button is selected. In fact, GnuCash selects this option for you after you run the initial search.
If the vendor you are searching for does not match the supplied search criteria, change the search criteria, click the New Search radio button and then the Find button. The relevant step is the New Search selection. If the vendor is not in the result of the original search, and you only search within this set, the vendor cannot be found, regardless of new search criteria.
Note
To return a list of all registered active vendors, set the search criterion to matches regex, and place a single dot “.” in the text field area. Make sure Search only active data is checked, then click Find. The regular expression “.” means to match anything.
Bills
A bill is a request for payment you receive from a vendor. GnuCash can track bills.
A credit note is the document you receive from a vendor to correct products or services rendered that you were incorrectly charged for on a bill. GnuCash can generate and track credit notes via the same menu entries as bills.
Note
This section applies to both bills and credit notes. In order to avoid repeating everything twice and to keep the text easier to read it will refer only to bills. You can apply it equally to credit notes. Only where the behaviour of credit notes differs from bills this will be explicitly mentioned.
New
When you receive a bill from a vendor and want to enter it into GnuCash, you must create a new bill. To create a new bill use the Business > Vendor > New Bill menu item, and fill in the resulting window appropriately.
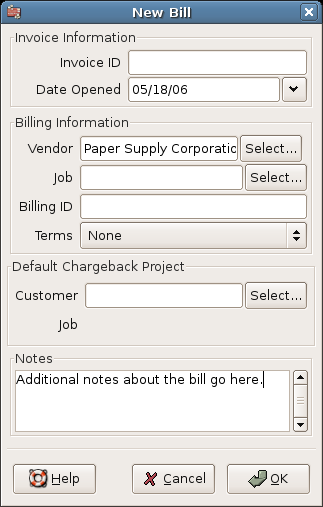
New Bill Registration Window
When you click the OK button the Edit Bill window opens.
Edit
From the Edit Bill window you can enter an itemized list of goods and services you purchased, in a manner similar to how the account register works. For credit notes you enter an itemized list of goods and services the vendor refunded instead.

Edit Bill Window
When you have finished entering all the items, Post the bill.
Post
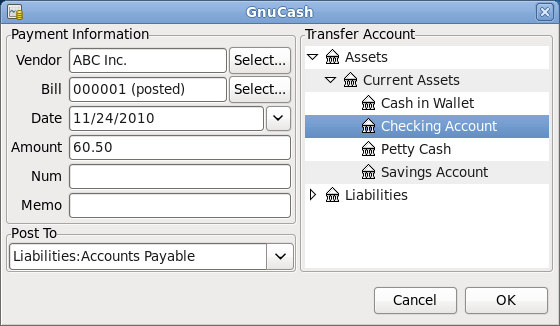
When you finish editing a bill, you should Post the bill. You do not have to post the bill, you can close it and return to it later. You have to post the bill eventually. Posting a bill places its transactions into an accounts payable account. The Post Bill window appears and asks you to enter information:
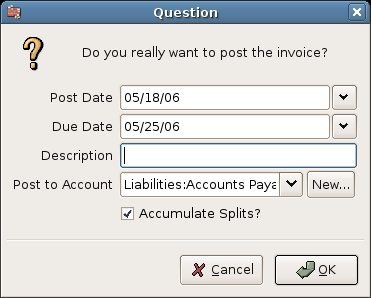
Post Bill Window
Find
To find an existing bill, use the Business > Vendor > Find Bill menu item. From the results of the search, you can select a bill to edit, or view.
Note
Before you can edit a posted bill, you will need to Unpost it.
Note
There are other ways to access an existing bill. These are similar to accessing invoices for your customers. See Find for more information.
Vendor Jobs
Vendor Jobs are used to group multiple bills and credit notes from a single vendor. Use of the vendor jobs feature is optional. The feature is useful when you have multiple jobs for the same vendor, and would like to view all the bills and credit notes for a single job.
To use vendor jobs, you must create them using the Business > Vendor > New Job menu item. You will see the New Job window.
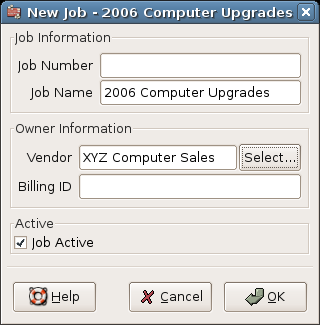
New Vendor Job
To edit an existing vendor job, use the Business > Vendor > Find Job menu item. Select the desired job in the search results, and click the View/Edit Job button.
To select from the bills associated with a given job, use Business > Vendor > Find Job menu item. Select the desired job in the search results and click the View Invoices button. A window listing bills and credit notes associated with this job appears. Select a bill or credit note and click the View Invoice button to open a bill editor in the main application window.
Payroll
Payroll is a financial record of wages, net pay, paid vacations, and deductions for an employee. This section demonstrates how to track payroll using GnuCash.
Basic Concepts
Payroll is a financial record of wages, net pay, paid vacations, and deductions for an employee. Basically, anything that relates to giving money or benefits to an employee. Payroll is one of the more complex tasks in accounting, because there are many different accounts, people, and agencies involved in paying salaries.
Payroll is typically accounted for as an expense. Sometimes accountants “store” some payroll expenses in a short term liability account. This is useful for things such as payroll taxes, which may be paid at a different time than the employee. The employee might get paid biweekly, while taxes are paid quarterly. This chapter presents a methodology which expenses payroll immediately for salaries, but stores taxes in liability accounts.
Note
GnuCash does not have an integrated payroll system. While you can track payroll expenses in GnuCash, the calculation of taxes and deductions has to be done outside of GnuCash.
Account Setup
Local tax law must be considered when setting up accounts. Because there are many different ways payroll taxes are handled throughout the world, this section presents a very simple structure. From this, you should be able to adapt your particular payroll deductions setup.
Assume that you must pay 2 taxes, Tax1 and Tax2, and that each has an employee contribution and an employer contribution.
The employee’s salary and these two taxes are expense accounts. The tax components are liability accounts. The tax liability accounts are where you accumulate the taxes withheld for all of your employees. The taxes are later paid to the appropriate government agency.
Simple Payroll Account Layout: -Assets –Checking -Liabilities –Tax1 (short term “storage” account) –Tax2 (short term “storage” account) -Expenses –Salaries –Tax1 –Tax2
Note
Resist the temptation to create per-employee sub-accounts to track individual salaries. Creating a sub-account for each employee leads to unmanageably large lists of accounts. Imagine the account structure after a few years of employees coming and going. It is much simpler to keep all of your employees’ payroll records within a single account (Expenses:Salaries for example) and use reports to view per-employee information.
The Transaction report can be used to sort and total by description or memo (but not by part of them).
To report salary transactions for a specific employee where the employee name or code is entered in the transaction description or memo, use the Find Transaction assistant (Edit > Find) to select the transactions, and then report on them using Reports > Account Report. Further formatting or analysis may be done by copying and pasting the report into a spreadsheet. See Find Transaction in the GnuCash Help Manual.
Payroll Protocol Sample
GnuCash does not have an integrated payroll system. GnuCash can track your payroll expenses, but you need to develop a payroll protocol and perform the calculations outside of GnuCash, in a spreadsheet for example. In this section, one such protocol is presented. You can use the sample protocol as a model.
Step 1: Deductions list
The first step to the payroll protocol is to create a list of all the possible taxes and deductions for each employee. Each entry should include definitions and formulas for calculating each value. Once the protocol is established it needs to be changed only when payroll laws or tax rates change.
In the proposed scenario, such a list would look like this:
E_GROSS_SALARY - Employee gross salary
E_TAX1 - Employee contribution to tax1 (X% of E_GROSS_SALARY)
E_TAX2 - Employee contribution to tax2 (X% of E_GROSS_SALARY)
C_TAX1 - Company contribution to tax1 (X% of E_GROSS_SALARY)
C_TAX2 - Company contribution to tax2 (X% of E_GROSS_SALARY)
Note
The employee’s net salary (E_NET_SALARY) is defined as E_GROSS_SALARY - E_TAX1 - E_TAX2 and need not be placed in this list since it is composed of items that already exist.
Place the actual formulas for calculating each deduction in this list. Sometimes these formulas are quite complex, and sometimes they simply say “look it up in table XYZ of the tax codes”.
Notice that you can calculate some interesting values using the above definitions. One such value is the total cost to the company: E_GROSS_SALARY + C_TAX1 + C_TAX2.
Step 2: Create the Transaction Map
When you record payroll in GnuCash, do so with a single split transaction. This split transaction populates the appropriate expense and liability accounts. If you need to look the payroll details at a later time, open the split transaction.
With the deductions list from above, an employee split transaction map can be generated. Each of the items in the list is mapped to a GnuCash account.
Account |
Increase |
Decrease |
|---|---|---|
Assets:Checking |
E_NET_SALARY |
|
Expenses:Salaries |
E_GROSS_SALARY |
|
Liabilities:Tax1 |
E_TAX1 |
|
Liabilities:Tax2 |
E_TAX2 |
|
Expenses:Tax1 |
C_TAX1 |
|
Liabilities:Tax1 |
C_TAX1 |
|
Expenses:Tax2 |
C_TAX2 |
|
Liabilities:Tax2 |
C_TAX2 |
Note that the C_TAX1 and C_TAX2 components have entries in the both the liability and expense accounts. The company component of each tax is expensed at the time of payroll, but remains a liability until taxes are due.
Step 3: Pay the Employee
Go to the account from which the employee will be paid, for example your Assets:Checking account. Open a split transaction and enter the real values using the Transaction Map above as a guide. Repeat this for all employees.
Tip
This manual process is tedious, especially if you have a large number of employees.
One GnuCash tool you certainly want use when entering employee payroll is duplicate transaction (use the Duplicate Toolbar button). This saves you from having to enter all the transaction splits for each employee. You still need to change the amounts of money to match each employee’s real payroll values, but you will not have to build the split for each employee.
If payroll transactions do not change significantly every pay period, you can also use the duplicate transaction feature to duplicate each employee’s most recent payroll transaction for the current pay period. If you find you are doing so all the time, read about the Schedule Transactions feature and save even more time!
Step 4: Pay the Government
The final thing to do is to pay the taxes to the government. The liability accounts have been collecting the taxes for various government agencies, and periodically you need to send a check to the government to pay this charge. To do so, you simply enter a 2 account transaction in (for example) your checking account to pay off the tax liability. The transaction is between the checking account and the liability account, no expense account is involved. The expense accounts are charged at the time the tax liability is recorded.
Business Payroll Example
Using the account setup seen previously, let’s go through an example. Assume that there are 2 employees (E1 and E2) who each earn $1000 per month gross salary. The employee contribution to Tax1 and Tax2 are 10% and 5% respectively. The company contribution to Tax1 and Tax2 are 15% and 10% each on top of the employee’s gross salary.
Starting with $50k in the bank, and before doing any payroll, the account hierarchy looks like this:

Payroll Example: Initial Setup
The deductions list for employee 1 are:
E_GROSS_SALARY - Employee gross salary - $1000
E_TAX1 - Employee contribution to tax1 - $100 (10% of E_GROSS_SALARY)
E_TAX2 - Employee contribution to tax2 - $50 (5% of E_GROSS_SALARY)
C_TAX1 - Company contribution to tax1 - $150 (15% of E_GROSS_SALARY)
C_TAX2 - Company contribution to tax2 - $100 (10% of E_GROSS_SALARY)
Account |
Increase |
Decrease |
|---|---|---|
Assets:Checking |
$850 (E_NET_SALARY) |
|
Expenses:Salaries |
$1000 (E_GROSS_SALARY) |
|
Liabilities:Tax1 |
$100 (E_TAX1) |
|
Liabilities:Tax2 |
$50 (E_TAX2) |
|
Expenses:Tax1 |
$150 (C_TAX1) |
|
Liabilities:Tax1 |
$150 (C_TAX1) |
|
Expenses:Tax2 |
$100 (C_TAX2) |
|
Liabilities:Tax2 |
$100 (C_TAX2) |
From the checking account, enter the split transaction for employee 1. It should look like this:
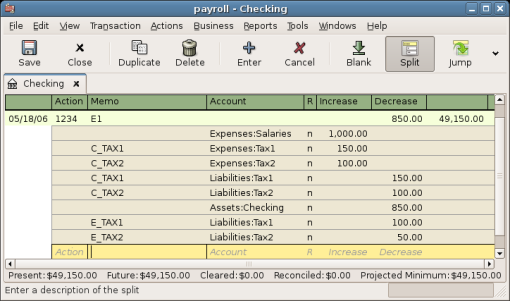
Payroll Example: Employee Split Transaction
Tip
When paying employees, enter only the employee name in the Description area. If you decide to use GnuCash’s check printing capabilities, the check is automatically made out to the correct employee. If you want to record other information in the transaction besides the employee name, use the Notes area, available when viewing the Register in double-line mode.
Repeat this for the second employee, which leaves the account hierarchy looking like this:
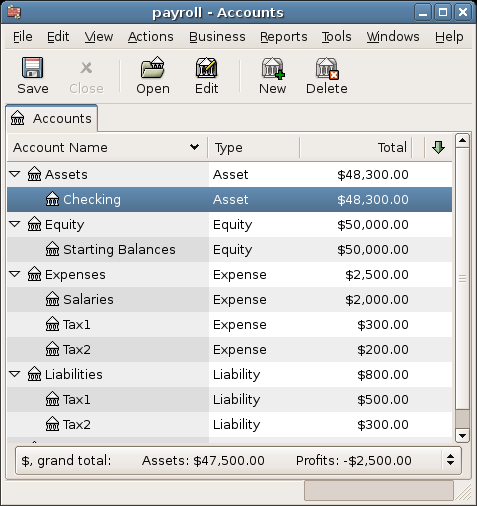
Payroll Example: Accounts After Salaries Paid
Now, you will enter the company contributions. The Liabilities:Tax1 and Liabilities:Tax2 accounts track how much you must pay to the government for each tax type. When it is time to pay these agencies, you will make a transaction from the checking account to these liability accounts. No expense accounts are involved. The main account will then appear like this:
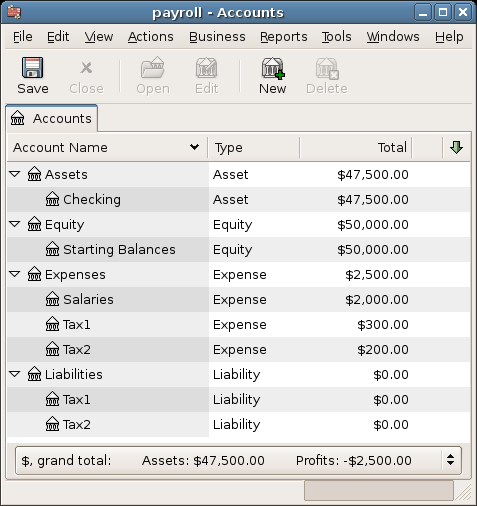
Payroll Example: Accounts After Paying Government